Digimaps
Parent Guide to Digimaps
Map window
The map window is the largest area in Digimap for Schools, where you view maps, select different maps, zoom in and out, pan around:
Top Toolbar
Above the map window, on the top toolbar you will find 'search, locate my position tool, print tool, aeriel imagery information tool and start again'

Sidebar
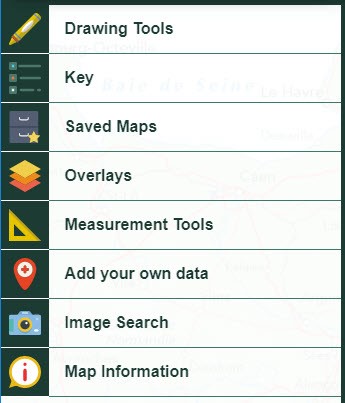
On the left of the map window, the sidebar has lots of tools
To zoom in on a location
 Double click on the map window
- Double tap on the map window
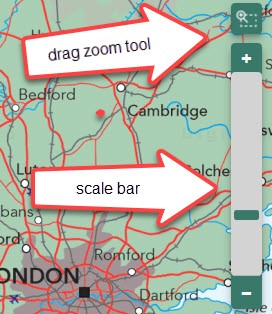
- Select the plus sign on the scale bar
- Select any point on the scale bar to zoom to that scale
- Select the drag zoom tool (above the scale bar), then drag a box on the map window to zoom to that area
- Move the mouse scroll wheel towards the screen, i.e. away from you
To zoom out
- Select the minus sign on the scale bar
- Select any point on the scale bar to zoom to that scale
- Move the mouse scroll wheel away from the screen, i.e. towards you
To move around
Click on the map window and drag, i.e. click and hold the left mouse button, then drag to move the map.
Tap on the map and hold, then drag to move the map.
Search box
Find the search box on the top toolbar, on the left.

Search options
You can search for a location in Digimap for Schools using place name, GB postcodes, British national grid references, easting/northing, latitude/longitude.
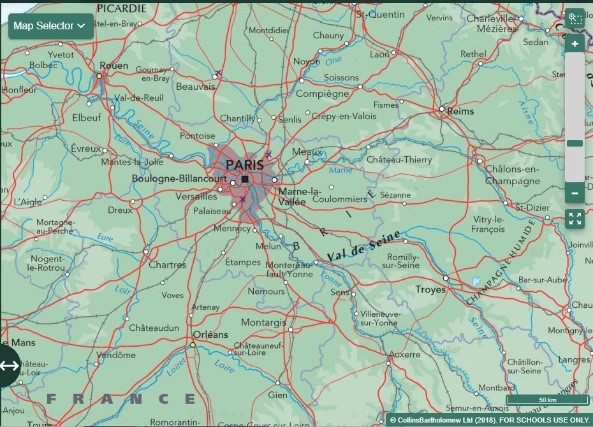
The Map selector tool is found on the map window and is used to select different maps to view in the map window. You can also fade between different maps, which can be useful to compare a historic and contemporary map.
Select a different map
 The Map selector button will be green when map selection is possible.
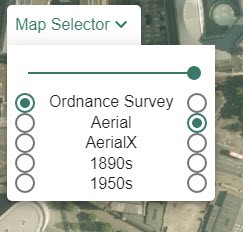
- To see what maps are available, select the Map Selector button to open the menu.
- To switch to a different map, select the button to the right of the map name.
- For example in the image below, Aerial mapping will be displayed as the button to the right is selected.
- Your selected map will be generated in the map window.
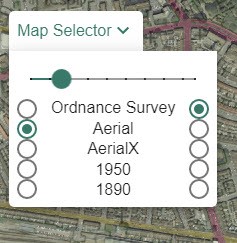
Fade between maps
 Use this to compare two maps.
- Select the Map Selector button to open the menu.
- Select the 2 maps you want to compare – in the image below, we have selected Ordnance Survey on the right and Aerial on the left.
- Now drag the slider bar to the left in stages.
- As you move the slider bar in stages, the two maps will be displayed on top of each other.
- When the slider bar is fully left, only Aerial will be displayed.
- When the slider bar is fully right, only Ordnance Survey mapping will be displayed.
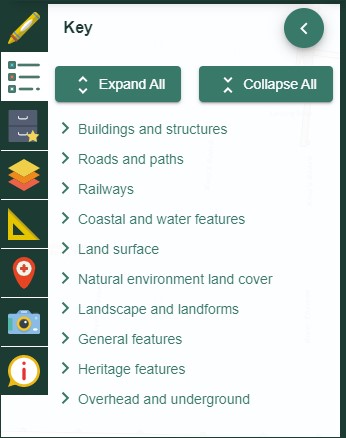
To view a map key
- Select Key from the sidebar.
- Select any group to view the symbols, e.g. Buildings and Structures.
- Select Expand all to open every group in the key.
- Select Collapse All to close every group in the key.
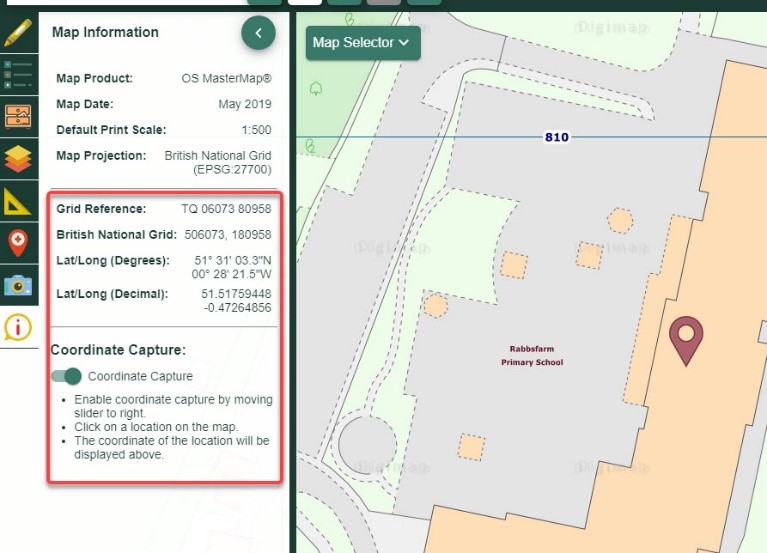
To find the coordinates for any point
- Open Map Information in the sidebar.
- Select the Coordinate Capture button, see image below.
- Select any point in the map window.
- Coordinates of your point are displayed in the Map Information area, in this order: 1. British National Grid Reference (only when over Great Britain 2. Easting, Northing (only when over Great Britain) 3. Latitude and longitude degrees 4. Latitude and Longitude decimal degrees
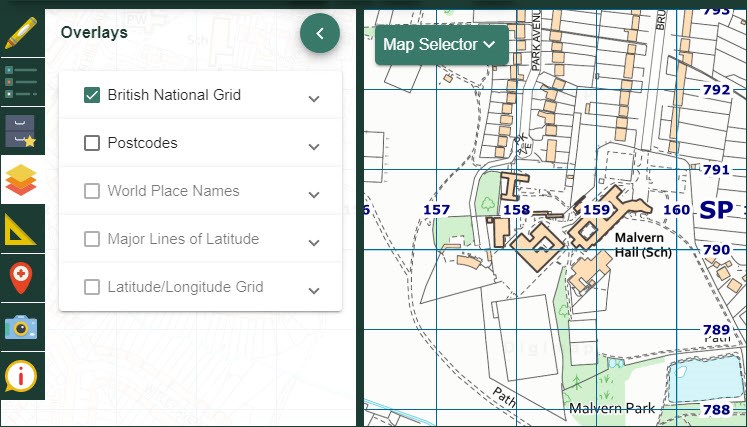
British national grid lines
- Open the Overlays menu in the sidebar.
- Check the British National Grid box.
- Grid lines are displayed in the map window.
- Adjust the transparency of the grid lines by moving the transparency slider left and right.
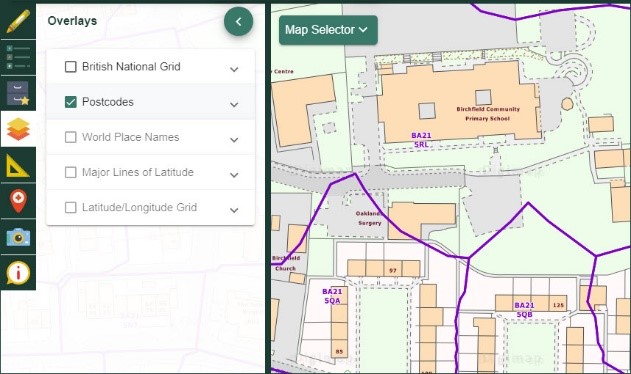
British Postcodes
- Open the Overlays menu in the sidebar.
- Check the Postcodes box. note: only available over Great Britain.
- Postcodes are displayed in the map window. Postcodes change in detail as you zoom in/out.
- Adjust the transparency of the postcodes by moving the transparency slider left and right.
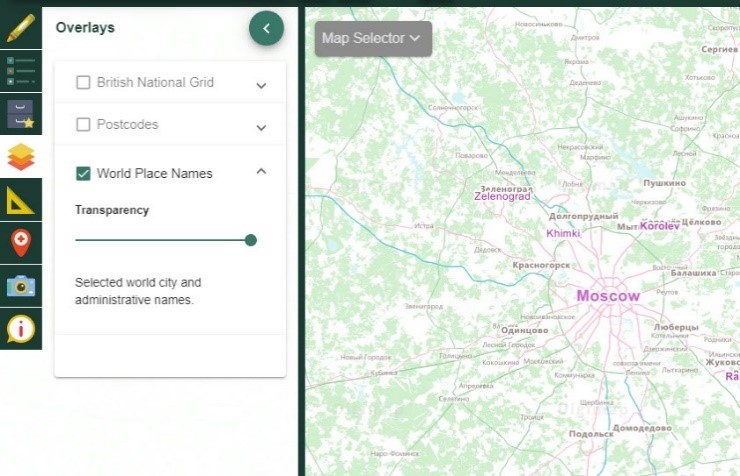
World Place Names
- Open the Overlays menu in the sidebar.
- Check the World Place Names box. This displays Roman character place names. Note: not available in the 4 most detailed scales.
- World Place names are displayed in the map window.
- Adjust the transparency of the names by moving the transparency slider left and right.
Major lines of latitude
- Open the Overlays menu in the sidebar.
- Check the Major Lines of Latitude box.
- The major lines of latitude are displayed.
- Adjust the transparency of the lines by moving the transparency slider left and right.

Latitude/Longitude
- Open the Overlays menu in the sidebar.
- Check the Latitude/Longitude Grid box.
- The grid lines are displayed.
- Adjust the transparency of the lines by moving the transparency slider left and right.
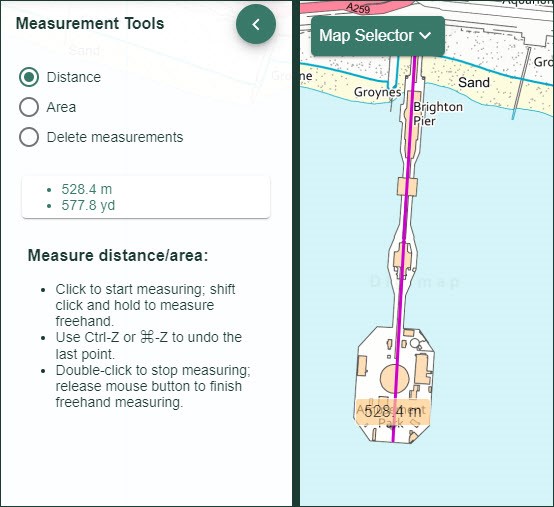
Distance
- Open the Measurement Tools menu in the sidebar.
- Select the measure distance button.
- Click or tap once on the map, at the point where you want to start measuring.
- Click or tap at the next point of your line.
- Continue adding points until you reach your last point.
- Double click or double tap to end your line.
- Your distance is displayed in the map window and in the measurement tools menu.
Area
- Open the Measurement Tools menu in the sidebar.
- Select the measure area button.
- Click or tap once on the map to place the first point of the area you wish to measure.
- Now move round the area, clicking or tapping to create each point.
- Double click or tap at the last point.
- The total area will be displayed in the map window and in the Measurement Tools menu.
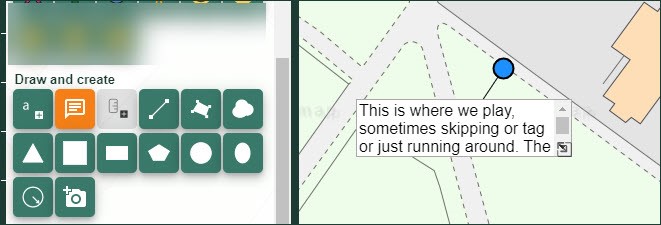
Add text box
- Open the Drawing Tools in the sidebar.
- Find the Draw and Create area.
- Select the Place text box tool, the second option.
- Now select the point on the map window where you want to place your box.
- Type the required text in the box.
- Select OK.
- Your box should be visible in the map window.
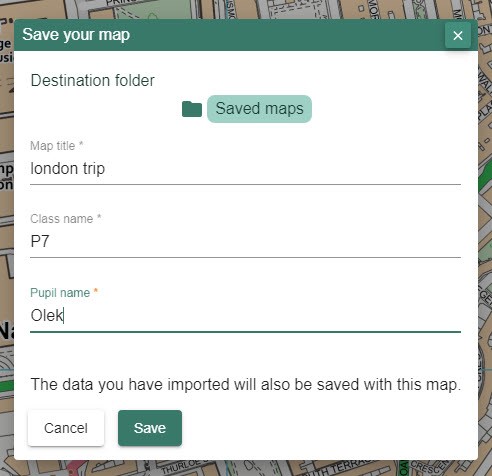
Save your map
- Now select the Save Map button (your destination folder is noted at the top of the Save box).
- Input a map title, class name and pupil name.
- Select Save.
- NOTE: if you have imported a file of locations, those locations and labels will also be saved with the map.